Accessibility in iOS applications
For one of our latest application, we had a strong requirement from the client. The app had to be completely accessible. What does it mean in practice? It means people with visual, auditory or physical disabilities can use the application and its features as any other valid user.
From the beginning of iOS, Apple has been providing several features for accessibility:
- Zoom, which magnifies the device screen
- Dynamic Type, letting readers choose their preferred text size
- Inversion of Colors (for colorblind users)
- Mono Audio, which combines stereo left and right channels into a mono signal played on both sides
- Speak Auto-text, which speaks the text corrections and suggestions while user types
- Voice Control, which allows users to make phone calls and control playback using voice commands
- VoiceOver, which reads the screen, element by element.
In this post we will focus on visual disability and on two accessibility features: Dynamic Type and VoiceOver. We will detail those features and present some pitfalls we ran into.
Dynamic Type
You can choose your preferred text size in Settings > General > Accessibility > Larger Text.
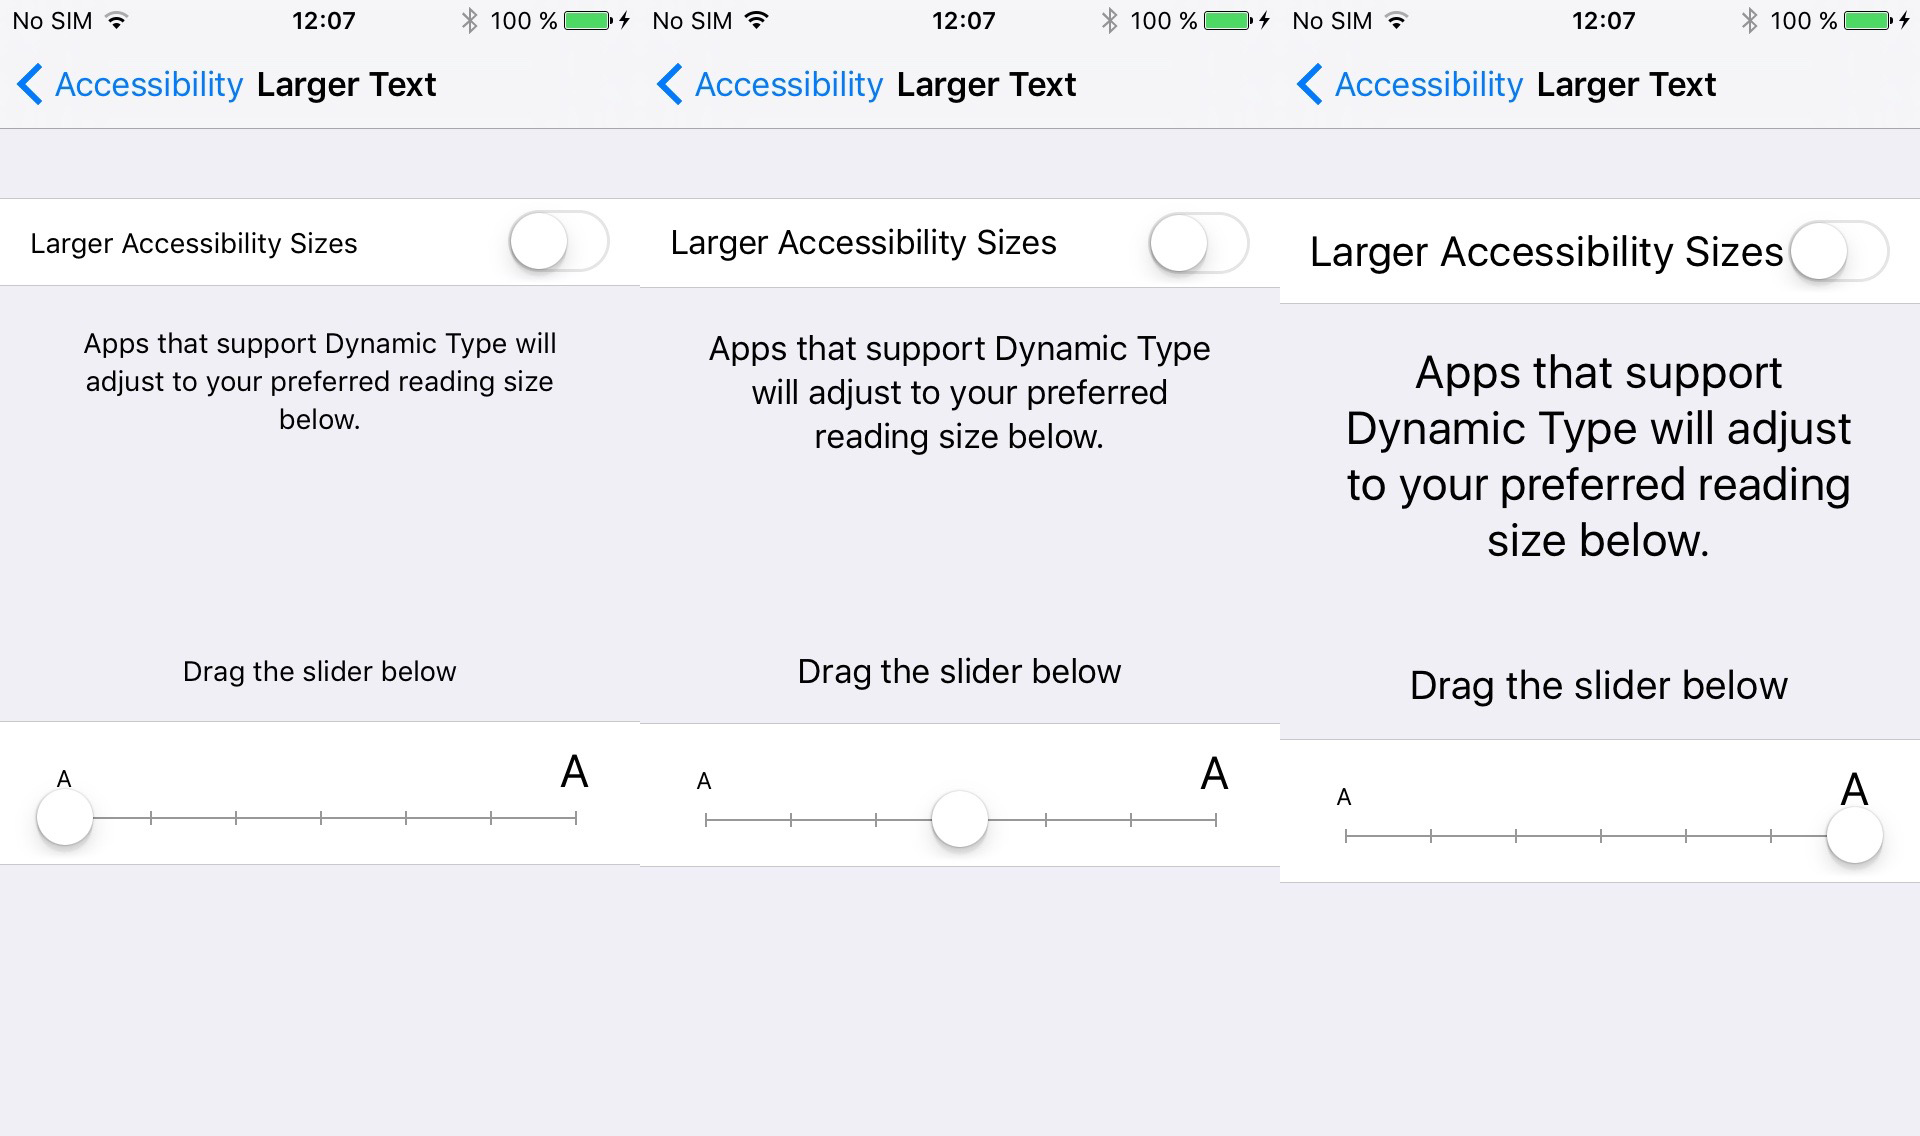
When you change the slider value, the system and all the applications that support Dynamic Type will update their font sizes.
To support Dynamic Type, we observe the NSNotification.Name.UIContentSizeCategoryDidChange notification and we make every view in our view hierarchy respond to this content size update.
Here is the snippet we use:
protocol ContentSizable {
    func ad_updateContentSize()
}

extension UIView : ContentSizable {
    func ad_updateContentSize() {
        subviews.forEach { $0.ad_updateContentSize() }
    }
}

extension UIViewController : ContentSizable {
    func ad_updateContentSize() {
        view.ad_updateContentSize()
    }
}

// This protocol allow to start/end observing `NSNotification.Name.UIContentSizeCategoryDidChange`
// `UIViewController` provides default implementation
protocol ContentSizeObservable {
    func startObservingContentSize()
    func endObservingContentSize()
}

extension UIViewController : ContentSizeObservable {
    func startObservingContentSize() {
        NotificationCenter.default.addObserver(
            self,
            selector: #selector(preferredContentSizeChanged),
            name: NSNotification.Name.UIContentSizeCategoryDidChange,
            object: nil
        )
    }

    func endObservingContentSize() {
        NotificationCenter.default.removeObserver(
            self,
            name: NSNotification.Name.UIContentSizeCategoryDidChange,
            object: nil
        )
    }

    @objc private func preferredContentSizeChanged() {
        ad_updateContentSize()
    }
}
We see that when a notification is triggered, the viewController has a chance to update its content, then let its view and its subviews handle the notification as well. It means every view or view controller should override ad_updateContentSize() and update labels and buttons fonts accordingly. This method will be called every time the system triggers a content size change.
Here is how to update the font of a label on screen:
class CustomTableViewCell : UITableViewCell {

    @IBOutlet var titleLabel: UILabel!

    override func ad_updateContentSize() {
        super.ad_updateContentSize()
        titleLabel.font = UIFont.preferredCustomFont(forTextStyle: .body)
    }
}
Note that in the snippet above we use a method preferredCustomFont to update the label font. This is because we want to use the Dynamic Type feature with a custom font. If you want to use the default font, you should use UIFont.preferredFont(forTextStyle: .body). You can find the different font sizes for each style in the iOS Human Interface Guidelines.
Here is a snippet that demonstrates how you can use a custom font with Dynamic Type:
extension UIFont {

    class func preferredCustomFont(forTextStyle style: UIFontTextStyle) -> UIFont {
        let font = preferredFont(forTextStyle: style) // default font
        let size = font.pointSize

        if style == UIFontTextStyle.headline || style == UIFontTextStyle.subheadline {
            return boldFont(size: size)
        } else {
            return regularFont(size: size)
        }
    }

    class func boldFont(size: CGFloat) -> UIFont {
        guard let font = UIFont(name: "CustomFontName-Bold", size: size) else {
            return boldSystemFont(ofSize: size)
        }
        return font
    }

    class func regularFont(size: CGFloat) -> UIFont {
        guard let font = UIFont(name: "CustomFontName-Regular", size: size) else {
            return systemFont(ofSize: size)
        }
        return font
    }
}
Dynamic Type is very simple to integrate to your code base and should simplify the way designers think about typography. Indeed, we are not reasoning about font family and size anymore, but in terms of font style hierarchy (.body , .headline, …).
VoiceOver
Another important accessibility feature is VoiceOver. VoiceOver is an Apple feature that reads the screen to the user, providing audible descriptions of the elements and actions in the application. The challenge with VoiceOver is to provide meaningful content, i.e accurate and helpful informations about elements on screen: position, description, behaviour, value and type.
Accessibility is UI
Before you start thinking about VoiceOver, you should learn all the gestures and shortcuts that are available. Indeed, there are at least 5 gestures for each set of fingers (from 1 to 4), which translate to plenty of combinations.
Once you master those shortcuts, you can understand how VoiceOver users will use your application. Those steps should be at your top priority way before the development, i.e. during the application conception and the UX/UI design phase. Making an application accessible starts from the very beginning.
Most of the time we add VoiceOver support too late, once the application is out there, in the V2 or V3 release. When it’s the case the impact is twofold: first the choices you made in the design process are likely to be incorrect for VoiceOver users, making the application difficult to use for them. Second, the time needed by developers to add the feature is bigger than if it had been done upfront.
There is no magic formula on how long it will take to integrate VoiceOver support in your application, but keep in mind that it will impact every screen of your application and will be more difficult as the UI is complex (custom views, interactive gestures, etc).
Supporting VoiceOver in our applications means we have to make all the elements that are displayed on screen accessible for the user. When activated, VoiceOver will iterate through all subviews in the screen and will read the description associated to each view. The content read to the user is customisable via the accessibilityLabel property on NSObject. UI elements that seem obvious and simple to interact with for regular users, will become very hard for users who can’t actually see them. That’s why VoiceOver users expect high quality accessibility labels for each element on the screen.
In addition to accessibility labels which are the static description of the screen, you have to specify accessibility hints that describe the actions available for each element. Static text won’t have any hint, but you may want to add some to buttons for instance. Those hints explain to the user how to interact with the current element (gesture, number of fingers to use, expected result…).
The last major aspect to accessibility is traits. Traits (UIAccessibilityTraits) help VoiceOver understand the meaning and intended use of the element. By default, UIKit applies appropriate traits for all standard controls, but we can choose to add some if needed. If VoiceOver focus on an element that have the UIAccessibilityTraitButton trait, it will treat it as a button, even if the view does not actually subclass UIButton.
You should think about accessibility labels, hints and traits as any regular content used to configure a view, except that they will be hidden for most users.
In some simple cases, the default implementation of VoiceOver is enough but there are edges cases that need custom behavior. Let’s see some of them.
Read numbers
In our applications, we sometimes have to present numerical values to the user. For instance, imagine we display the population of a city, let’s say 520215.
By default, if you create a label and set its text to this value, VoiceOver will read the following:
five two zero two one five
That’s not the result expected because we can’t represent this number in our head. A simple solution is to create another value to be read by VoiceOver. In this case, we can leverage the .spellOut style of NSNumberFormatter.
let population = 520215
let formatter = NumberFormatter()
formatter.numberStyle = .spellOut
let accessibilityLabel = formatter.string(from: NSNumber(value: population))

// Configure the label
label.text = String(population) // "520215"
label.accessibilityLabel = accessibilityLabel // "five hundred twenty thousand two hundred fifteen"
The system will now read the accessibilityLabel we set for the label, which is way more understandable for a human being:
five hundred twenty thousand two hundred fifteen
Adjust values
Let’s imagine you display a stepper, to update the value of a counter. The UI looks like this:
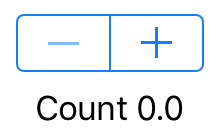
If we let the default accessibility values, here what happens: the focus will go to the minus button, then the plus button, and finally to the count label.
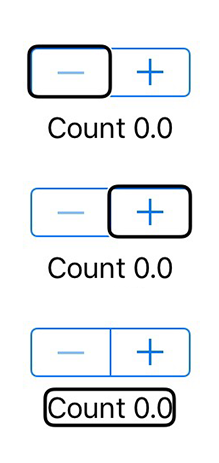
Here what is said by VoiceOver when we play these actions:
- Focus minus button: « Decrement, dimmed, button. »
- Focus plus button: « Increment, button. »
- Double click plus button: « Increment. »
- Focus label: « Count one point zero. »
That is not effective for a few reasons. First we have to select two different UI elements to change the value (plus and minus buttons) and a third (the label) to read this value. Second, when we interact with a button (plus or minus) we can’t be notified that the counter has changed, and what is the new value.
One solution to this problem requires to change the UI a bit. We can create a wrapper view that contains the stepper and the label. Then we tell VoiceOver to only consider this wrapper view and not its subviews. That way the system will only focus the wrapper view. Next we change the wrapper view trait to be UIAccessibilityTraitAdjustable.
As seen before, traits describe a single aspect of an element’s state, behaviour, or usage. In our case we want the element to be adjustable. Apple says in its documentation:
Use this trait to characterize an accessibility element that users can adjust in a continuous manner, such as a slider or a picker view. If you specify this trait on an accessibility element, you must also implement the
accessibilityIncrement()andaccessibilityDecrement()methods in theUIAccessibilityActionprotocol.
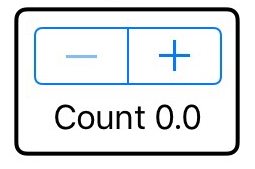
Here is the result after the update:
- Focus on wrapper view: « Counter. Count zero point zero. Adjustable. Swipe up or down with one finger to adjust the value. »
- Swipe up: « Count one point zero. »
Note that this time all the informations are read at the same place. We do not have to move across elements anymore. What’s more, the adjustable traits provide the hint for free (« Adjustable. Swipe up or down with one finger to adjust the value. »).
Here is the snippet we used in this example:
protocol AccessibilityAdjustableContainerViewDelegate : class {
    func accessibilityAdjustableContainerViewDidIncrement(_ view: AccessibilityAdjustableContainerView)
    func accessibilityAdjustableContainerViewDidDecrement(_ view: AccessibilityAdjustableContainerView)
}

class AccessibilityAdjustableContainerView : UIView {

    weak var delegate: AccessibilityAdjustableContainerViewDelegate?

    override var accessibilityTraits: UIAccessibilityTraits {
        get {
            return super.accessibilityTraits | UIAccessibilityTraitAdjustable
        }
        set { super.accessibilityTraits = newValue }
    }

    override var isAccessibilityElement: Bool {
        get {
            return true
        }
        set { super.isAccessibilityElement = newValue }
    }

    override func accessibilityIncrement() {
        delegate?.accessibilityAdjustableContainerViewDidIncrement(self)
    }

    override func accessibilityDecrement() {
        delegate?.accessibilityAdjustableContainerViewDidDecrement(self)
    }
}
class ViewController: UIViewController, AccessibilityAdjustableContainerViewDelegate {

    @IBOutlet var stepper: UIStepper!
    @IBOutlet var label: UILabel!
    @IBOutlet var wrapperView: AccessibilityAdjustableContainerView!

    override func viewDidLoad() {
        super.viewDidLoad()
        wrapperView.delegate = self
        wrapperView.accessibilityLabel = "Counter"
        stepper.value = 0
        updateLabel()
    }

    //MARK: - AccessibilityAdjustableContainerViewDelegate

    func accessibilityAdjustableContainerViewDidDecrement(_ view: AccessibilityAdjustableContainerView) {
        let newValue = stepper.value - 1
        guard newValue >= stepper.minimumValue else { return }
        stepper.value = newValue
        updateLabel()
    }

    func accessibilityAdjustableContainerViewDidIncrement(_ view: AccessibilityAdjustableContainerView) {
        let newValue = stepper.value + 1
        guard newValue <= stepper.maximumValue else { return }
        stepper.value = newValue
        updateLabel()
    }

    //MARK: - Private

    @IBAction private func stepperValueChanged(_ sender: UIStepper) {
        updateLabel()
    }

    private func updateLabel() {
        label.text = "Count \(stepper.value)"
        wrapperView.accessibilityValue = label.text
    }
}
In the code above you can see we update the wrapperView.accessibilityValue every time the label is updated. This is because the system will read this value only when it changes.
The rotor
You can display the rotor if you hold with two fingers and twist left or right.
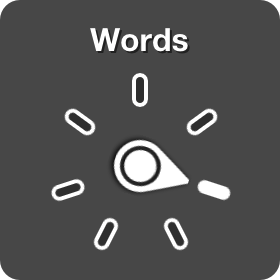
The rotor display several actions or movements that can be performed:
- Containers (move along containers)
- Headings (move along headers)
- Adjust Value (if element
isUIAccessbilityTraitAdjustable) - Custom (from iOS 10 with
UIAccessbilityCustomRotor) - Actions (from iOS 8 with
UIAccessbilityCustomAction) - Characters (read words character by character)
- Words (read content word by word)
- Speaking rate (adjust the speaking rate)
Once a rotor value is selected you can move from one item to another flicking your finger up or down.
For example if you select the value Headings, you will move from UI elements that have the UIAccessibilityTraitHeader trait.
In the example below, if the focus is on the first header Header 1 and that Headings is selected in the rotor, when you flick your finger down, the focus will move to the second header Header 2 skipping all the content between.
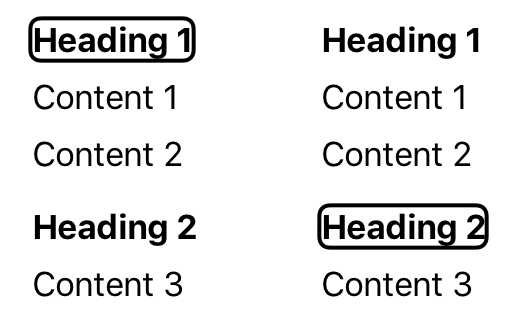
This feature allows VoiceOver users to save time, scanning only the relevant content. This is why you need to carefully choose the traits for each UI element.
From iOS 8, Apple decided to improve the rotor customisation, first providing the UIAccessbilityCustomAction API then the UIAccessbilityCustomRotor in iOS 10.
A UIAccessibilityCustomAction is just a named target/action pair which allows to create custom accessibility actions for a specific UI element.
If you want to define a custom movement (as seen with the Heading example above) you can now use UIAccessbilityCustomRotor. From a target element (the element that has the focus by VoiceOver) and a direction, you can choose which element is the next to focus.
As an example, extracted from the UIAccessbilityCustomRotor header:
… in a magazine app, a custom rotor can be created to allow the user to find the next link or heading within an article.
A last note on the rotor value: Container. When selected, we can jump from build in containers like UINavigationController or UITabBarController. This allows to quickly access the navigation bar or the tab bar when VoiceOver focus is somewhere else in the screen.
Unfortunately, we can’t define our own containers yet. The API is private and Apple use a special UIAccessibilityTraits to get that behavior.
If you inspect a navigation bar, you’ll see the special and undocumented constant used:
po [navigationBar accessibilityTraits] => 0x0000200000000000If you want to separate your UI in multiple logical sections, you’ll have to fallback using UIAccessibilityTraitHeader instead.
Notifications
When elements change on the screen and you want to keep the user up to date with the new visual content, you have to notify VoiceOver through notifications.
For this purpose, you should use the UIAccessibilityPostNotification() method. You can optionally pass arguments to this method to move the focus to specific elements.
We had to use this feature when we wanted to tell VoiceOver to focus on a particular element. Most of the time, the issue happens when a view controller is dismissed, and the wrong element is read by VoiceOver when the previous view controller is displayed.
We tried using both UIAccessibilityScreenChangedNotification and UIAccessibilityLayoutChangedNotification to force VoiceOver to select an element. But we found that notifications have non consistent behaviour.
Sometimes both notifications did the trick, sometimes only one of them. VoiceOver is a black box and we don’t know exactly how it selects the elements on the screen. That’s why trying to force the system is not working every time.
Reacting to VoiceOver
You can test if VoiceOver is running with two methods:
- proactively with the
UIAccessibilityIsVoiceOverRunning()method - reactively listening to
UIAccessibilityVoiceOverStatusChangednotification
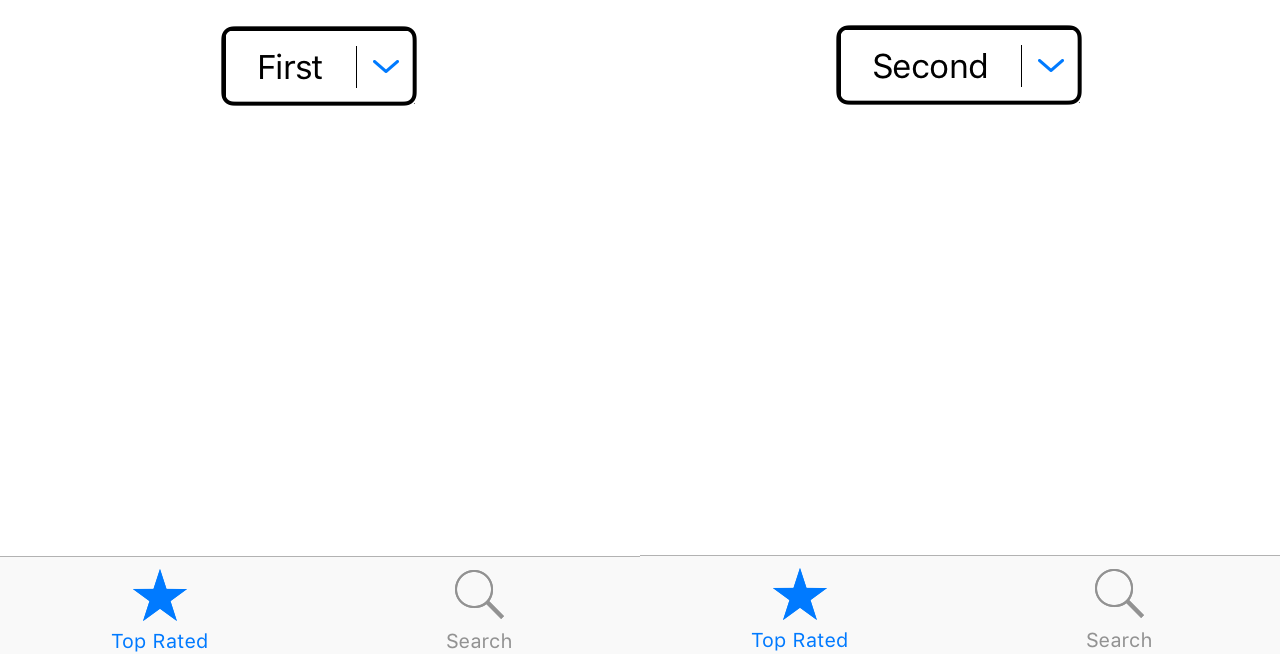
You should use those methods to update your UI if VoiceOver is activated or not. For example let’s imagine you have a dropdown button and you want to display a picker as the inputView when you tap on it (see image below).

One solution would be to let the user select a value in the picker both with and without VoiceOver. But using a UIPickerView with VoiceOver is a total pain.
A better solution would be to let the user select a value in the picker if VoiceOver is not activated, like regular users. But if VoiceOver is running, we could leverage the UIAccessiblityTraitAdjustable trait to avoid displaying the picker view and let the user change the value swiping up or down.
Final note
Accessibility in iOS is a very powerful feature and Apple put it at the core of their products from the very beginning (for instance, even the camera app is accessible).
It’s important to add accessibility support to your application if it’s intended to be used by people with visual disabilities (which is always the case if you target a mass market) because it will help you reach more users. Also, accessibility also improves the usability for all your users (for example, autocomplete was first developed as an accessibility feature but is now used by everyone).
What’s more, you should start thinking about this feature at the early stage of your development process to be sure it’s fully and correctly integrated to your product. Apple default implementation does a great job but it’s not perfect and you often have to tweak it to create a better experience.